
In this tutorial, you will learn how to install, Episerver CMS via NuGet. The advice in this guide relates to all versions of Episerver over v7! Being able to install Episerver via Nuget makes upgrading a lot simpler compared to previous versions that used the deployment manager. For people reading this who can't remember, having to manually manage package dependencies think yourself lucky 🍀🍀🍀
Nuget is installed as part of the Visual Studio installation process, if you don't have it then Google is your friend. Episerver uses its own special Nuget repository. You need to add the Episerver Nuget feed within your Visual Studio, otherwise, you will not be able to find and install the Episerver packages. To add the feed, within Visual Studio click:
Tools ➡ Options➡ NuGet Package Manager ➡ Package Sources
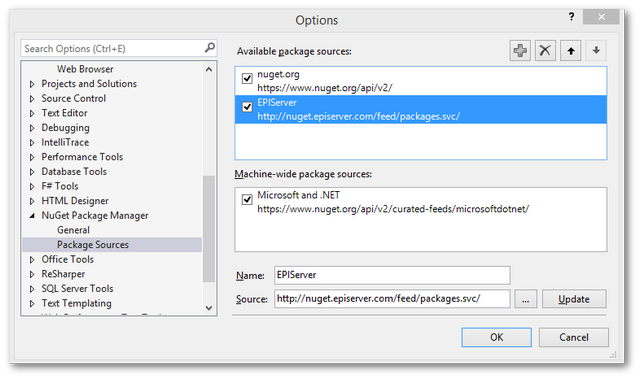
Click the + icon and at the bottom add Episerver as the name of the feed and within the package source option, use this URL:
http://nuget.episerver.com/feed/packages.svc/
Click Update and you're done 💥. In Nuget explorer, you should now see an Episerver option within the Online section. From here you can browse all of the packages within the Episerver feed.
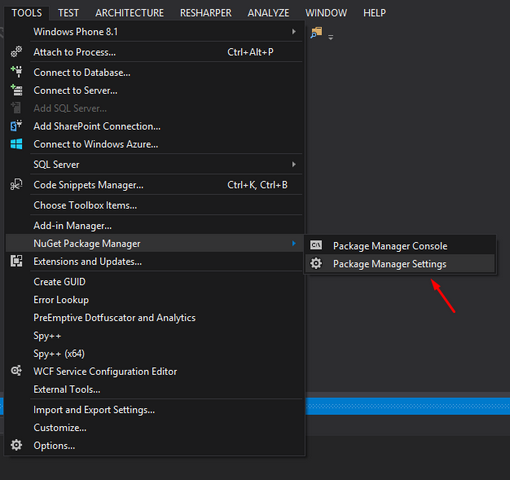
When building a new Episerver website, there are lots of configuration and database tweaks required. This is why the easiest method to get a new Episerver website up and running is via the visual studio extension, which you can download here. After installing this package, you will have access to a new Visual Studio installation template that will allow you to install a new Episerver instance. This template will then call the Episerver Nuget feed to get the packages that it needs to install Episerver.
To create a new website, within Visual Studio create a new project:
To easily locate the template, type epi into the search field. You should see a template called Episerver Web Site appear:
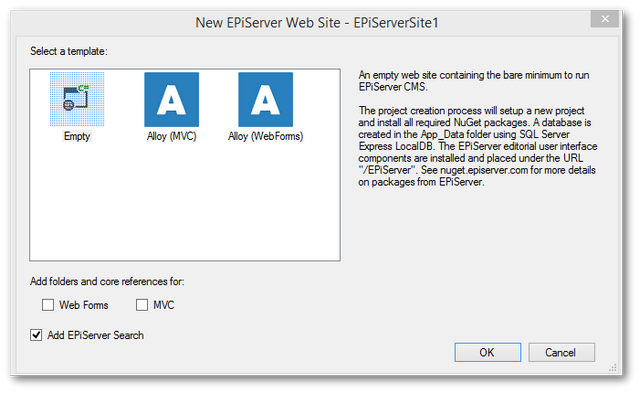
Select which project type you want, hit 'Ok' and sit back and relax. For first time users, I suggest you use the Alloy Sample Site. I should warn you, I have waited around 20 minutes for this process to finish. The Empty project obviously will take less time as it has less to install, however, the empty template gives you a bare bone install which can be very frustrating when you do not know what is going on 🤪🤪🤪
After the installer completes successfully, I suggest that at this point you hit F5 key within Visual Studio to run the site and make sure the site works OK. If you used the Empty template you will see a 404 page. If you see the blow error that's OK. All the error means is that you still have some database configuring to do.
A network-related or instance-specific error occurred while establishing a connection to SQL Server. The server was not found or was not accessible.
Talking of databases, you may be puzzled as to how Episerver is using one when you haven't configured SQL server yet!!!! The installer uses a file-based SQL lite database. The location of this file-based database is in the App_data folder. In here you should see two files with an .mdf and a .ldf extension. File-based databases and OK for a sample database, in most scenarios you will want to host your Episerver database in SQL server, rather than your websites App_data folder. To do this move the .mdf and .ldfout of your App_Data folder, attach it in SQL using SSMS and then the web.config connection string section update your connection details. The format of the connection string should look like this:
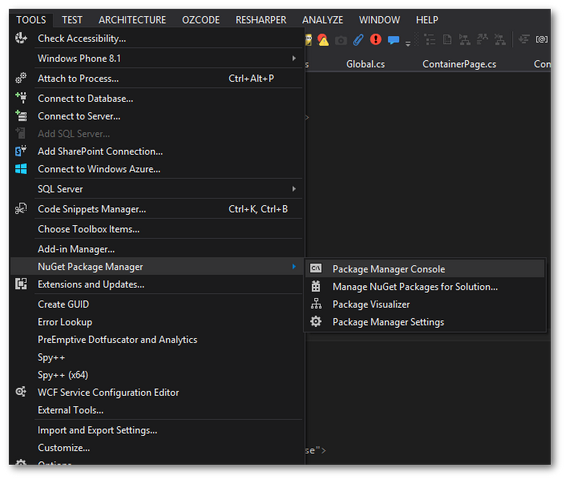
Update the Core packages: After installing the site, it is very likely that a few of the Nuget packages are out-of-date and it is a good practice to update them. After I've created a new project, I always update the Episerver core packages just to make sure I'm using the latest version. To do this, right-click on your new website within solution explorer and go to Manage NuGet Packages. In Nuget, make sure Update is selected. Click on the Episerver feed you created earlier. You will probably see a list of packages that are out of date. If you click the Update All button, Visual Studio will now update all the packages.
Now you've updated the core packages you may also need to update your database. To check if you need to update your database, run the site. If you get a database error then you'll need to run a simple database update command within the Nuget terminal. Type in update-database and Nuget should automatically run the required SQL scripts to upgrade your website.
 T
T
If you have followed the above instruction correctly, you should now have a fully working Episerver site 💥. I've created many websites using this process, it is super simple so enjoy Episerver CMS! Happy Coding 🤘
