In today's guide, I'm going to walk you through installing the Episerver to Lionbridge connector package. This package is useful if you want to create a CMS based translation service for your content editors. Note, I am not endorsing this product, I'm simply showing you how to install it 😊😊😊
The Lionbridge translator is a third-party component that can be installed within Episerver to provide language translations. The out-of-the-box workflow to translate the content found within an Episerver powered website to add multi-language content might look like this:
- Create all your content within English
- Go through the CMS, copy all the text into a spreadsheet
- Send the spreadsheet off to a transplantation service
- Wait
- Add the translated content into the CMS
Configuring Lionbridge
The Lionsbridge plug-in gives you an alternative workflow. By using this package, you can send the whole site off to Lionbridge to get it translated into French. When a translation is ready, it's a simple click a button activity to import the content into Episerver. If you do a lot of translations, this can save content editors a load of time.
Configuring Lionbridge
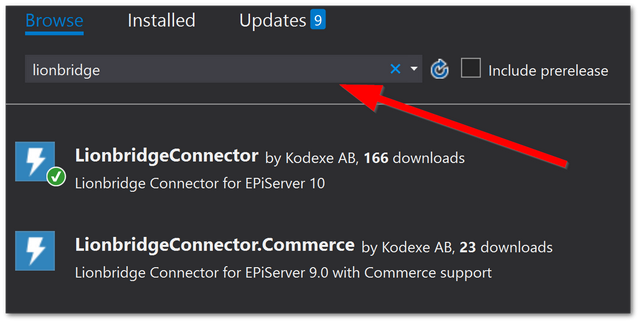
Installing Lionbridge with Episerver is fairly pain-free. First, you'll need to make sure that you have a Lionbridge license. This is basically two snippets of XML that you will have to get from Lionbridge. After you have a license, on the Episerver Nuget feed, https://nuget.episerver.com, type in Lionbridge:
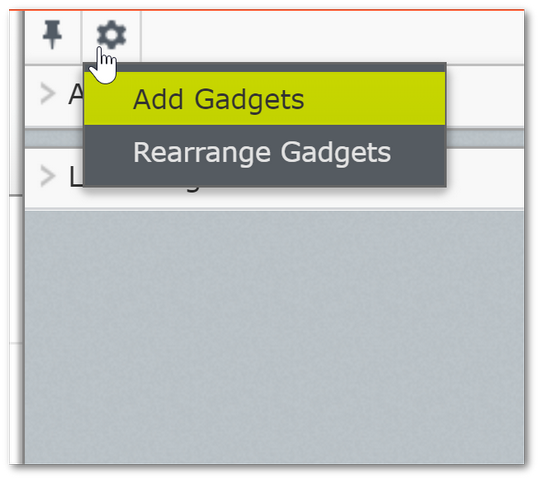
After installing the plug-in, build your project and load Episerver. Log into the editor and create a new gadget. I usually do this on the right-hand section on the main dashboard, like so:
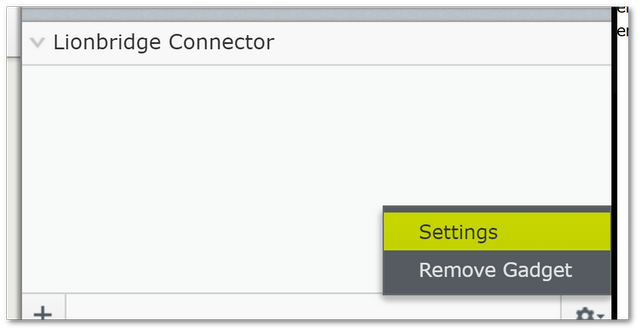
In the gadget options, you should see the Lionbridge translator listed. Add that to the page. Next, we add the license file. You can do this by clicking on the Lionbridge settings tab, like so:
In here you'll see two fields, a source and a target. You need to add the XML provided to you by Lionbridge. The third is the language mapper file. A dummy one might look like this:
Ensure Your Scheduled Tasks Are Set
You need to enable the two Episerver Lionbridge scheduled tasks. These tasks are responsible for sending your requests over to Lionbridge and without enabling these tanks the plug-in will not do much. To enable these tasks, in the Episerver admin section, find the jobs called Translation background jobs and 'Translation projects updater. Ensure both are enabled and set to run every 5 minutes.
Creating A Lionbridge Translation
To create a new 'Lionbridge project, open the Lionsbridge gadget and create a new project. To create a new project, within your Lionbridge gadget, click the + icon, like so:
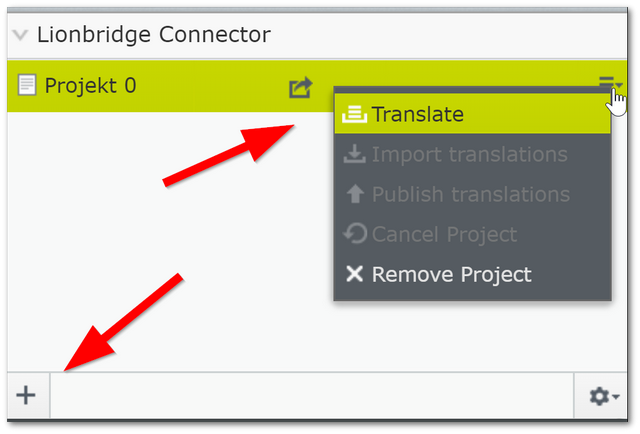
In the project, add all the pages that you want to be translated. Add a date you want the translations done by, select the translation type, e.g. English ➡ Swedish, then submit the project to Lionbridge. The One word of warning YOU NEED TO SET THE DATE IN THE FUTURE otherwise, the project will throw an error. When you are ready to submit your project, click the 'Publish translations button that you can see greyed out in the screenshot above (after adding valid config the button will be clickable). Another consideration is that after you submit your project you may have to wait a really long time (usually days) before the results are returned. An actual person has to do the translations for you so this will take time. You will get a notification that your translation is ready.
After Translation Has Completed
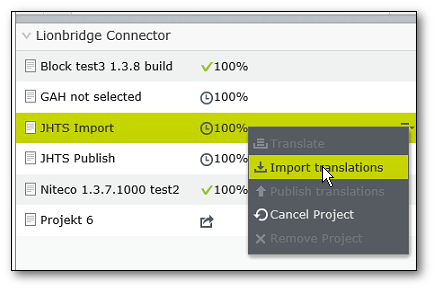
When your translated copy is ready you should get an email from Lionbridge. Within the Episerver editor, the translation project will also show 100%. To Import the translations into your pages, click the burger menu icon next to your translate Lionbridge project and select Import Translations:
After the import process runs you should then be able to see the translated page within Episerver. The quickest way to do that is to navigate to the source page and within the 'languages now available' field. Click on the language you had selected and the translated page should now display.
One word of caution, if you change your content types while submitting a translation then the importer will break. I am no endorsing this package as we found a lot of issues with it, however, if you can get it working as needed it will save you time. Happy Coding 🤘 I've only used Lionbridge connector with Epsierver on one project so far and it does what it says on the can. I have no idea if there are alternatives out there, but this does work.
The main downside, that I came across as a developer, is that if you want to tear-up/down your database for unit testing, then as the connector is a gadget (and Episerver has no API to interact with it) there s no way to automatically inject the Lionbridge license in code. This has to be done manually. You could create a SQL script to try and automate this, however, I NEVER RECOMMEND THAT YOU BYPASS THE EPISERVER API!!! so you've been warned :)
