In this tutorial, you will get a high-level overview of the Sitecore upgrade process. Upgrading Sitecore is usually very painful. The reason for this is that an upgrade often involves a lot of manual changes. Forgetting to apply a change, or making a wrong change can break the site. Even if you follow the upgrade steps perfectly, I have bad news, the upgrade can still fail 😞
As each Sitecore instance can be wildly different, just following the recommended steps will not always work. Some sites will upgrade easily, some will have you swearing and shouting at your screen. I've been using Sitecore for around 5-6 years now and in that time I've seen a lot of wild and wacky issues occur while upgrading. Based on these experiences, I've found that if you follow some basic core principles you can make life a lot easier. If you want to learn what these simple guidelines are, read on 🔥🔥🔥
Read The Documentation: When upgrading version x to x, read the documentation. It might be tedious, however, the documentation will give you all the official steps that you will need to follow. All this information can be found in the Sitecore developer portal (SDN).
When you visit the Sitecore SDN for the version you want to upgrade to, you should see a list of all the steps you need to go through in the prerequisites area. You will need to follow every step from your current version to the version you want to upgrade to on each environment.
Modules: As part of this upgrade process, you will need to update your modules as well. This means during an upgrade you need to know all the modules that are installed within your site. Read the upgrade notes for each package before you begin. For example, WFFM needs to be upgraded inline within the website upgrade. If you forget to do this, then you may have to start the whole process from scratch again. Trying to upgrade a module after the fact may not work 😞
To help with this step, use the Sitecore Modules Compatibility Table. This is a great place to see which modules will need to be upgraded, the steps required and when in the upgrade process you need to make the changes.
Separate Custom Configurations: In most Sitecore builds, you will need to add some degree of web.config customisation. You may need to add an app setting or a custom section. When you perform a Sitecore upgrade, the web.config file is usually the file that will require the most amount of changes. Instead of messing around with nasty merging, if you separate your customizations into a separate configuration file and use transforms to apply those changes, life can be much easier 😊
To do this, take any changes you've made in your web.config and create a duplicate web.config that only contains your changes here:
App_Config ➡ Include
By separating your custom changes into a seperate file, you can often use the default web.config that comes with the version you are upgrading to. No merging required 💥
Like-for-Like: When upgrading it's very common for the business to ask to add feature x or y at the same time. Push back and say no to these requests. When you do an upgrade, stick to a like-for-like upgrade. This prevents the possibility of extra bugs being introduced and new issues that can cause you heartbreak.
Do Not Try To Rush: Upgrading Sitecore can be a time-consuming process. On a recent project, it took me over 16 hours to fix my upgraded site, so the search indexes and link database indexes could be refreshed.
As upgrading can be so tedious, it can be very tempting to try and skip some steps to try and make the process quicker. From my experience, anytime I've tried to rush an upgrade, it's always taken more time in the long run. When you rush and skip steps, things will inevitably go wrong. Each step in the process is usually there for a reason (even if you don't know the reason yourself) so trust it.
Back-Up At Each Major Step During an upgrade, you usually have to go through a very structured set of steps. You run an upgrade, you publish your code to the website, you install modules, you upgrade NuGet packages etc.. at each and every step BACK-UP your webroot. If things go awry instead of having to start from scratch each time, it's a lot easier if you start from the last step in the process.
You can only do this if you are very thorough with your backup plan. Also, remember when you upgrade you will have to upgrade your dev, test, authoring, live servers, so don't delete any of these back-ups until your new project is live and signed off. I've made the mistake a few times of upgrading my local dev versions, deleting all the backup folders only to realize I needed them when it came to upgrading the next environment 😭.
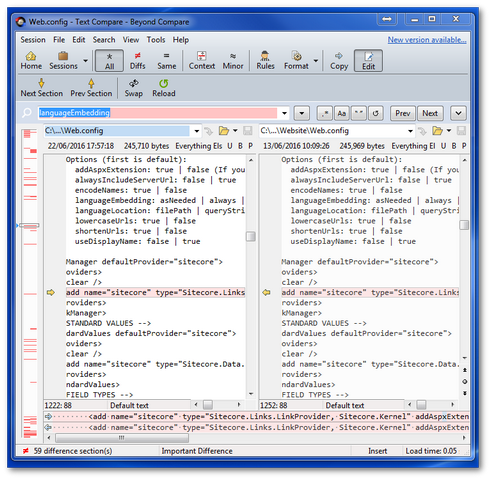
Folder and file comparison: One life-saving tool to have in your toolbox when upgrading Sitecore is a folder and file comparison tool. The ability to be able to compare your webroots file and folder structures to either vanilla files, or, files from a previous backup is essential Comparing the current webroot to a fresh version x install will show you what config changes have been made and what files might be missing.
Out of all the comparison tools I've used, Beyond Compare is my go-to tool. I think Beyond Compare is the most feature-rich and UI friendly diff tool.
Beyond compare isn't free, so you may have to settle for Win Merge as a free alternative 😊
You are now read to upgrade Sitecore CMS. Good luck! Happy Coding 🤘