In this tutorial, you will learn how to lock the Umbraco backend down so it is not accessible. Locking the editor down is not only useful for security, it can also be an essential step when configuring Umbraco to work within a load-balanced environment. There are a few approaches you can take in order to restrict access to the Umbraco backend. Within this tutorial, you will learn about all the options as well as my recommended approach. If you are looking at making your Umbraco instance more secure, this is the tutorial for you 🔥🔥🔥
Umbraco Backend 101
In order to access the Umbraco backend you append the term umbraco to the end of your website address:
Keeping the Umbraco backend open is not secure anyone knows how to access the Umbraco backend and knows your website has been built using Umbraco, they can run a brute force program to try and gain access to the editor. By allowing access to this URL you are giving hackers massive clues about the tech that is powering your website. The more information a hacker has about your site, the easier their job becomes 😭
There are several ways to prevent access to the backend. From my experience, the easiest and quickest option is to set up a dedicated sub-domain that will be used as the only way to access the backend. You can then block access to the Umbraco backend from your primary websites URL and only allow access to the backend via the sub-domain. The backend will still be available, however, someone will need to know the admin hostname which is a lot less likely 😊
Lucky, setting up Umbraco to work this way is pretty pain-free. In order to get started you will need the following:
URL REWRITE: This magic will work using redirects. The best way of dealing with redirects in ASP.NET is to use Microsofts Url Rewrite module. Make sure the Rewrite module is installed on all your servers!!!
Admin Sub-domain: The sub-domain that you will be using in the backend can be anything you want. You could use something like
backend.website.comorsecure.webste.com. Use what makes you happy ❤️
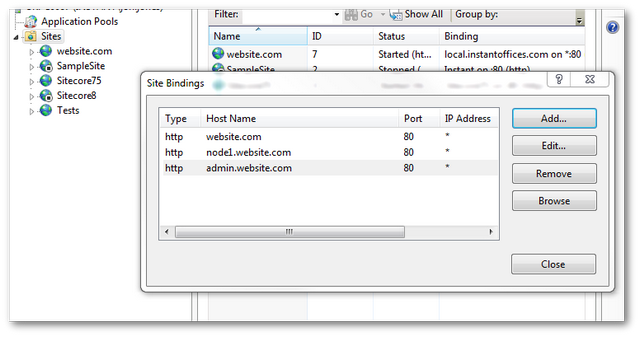
You will need to create this sub-domain within your DNS providers control panel. You also need to add the hostname within your website entry in IIS:
- Decide on a WWW or non-WWW URL strategy: You should also consider if your site will use a WWW or non-WWW policy. More information about this can be found in this article, Setting Up Umbraco To Always Use WWW Links. Depending on which policy you adopt will determine the redirect Regex rule you will need to use. For this guide I assume you use a WWW URL strategy ✔️
How To Set-up Your Umbraco Web.config For A Load-Balanced Environment?
You will need to add this file within your web.config:
This rule tells IIS to redirect any traffic to your website that doesn't have WWW. In this example, I'm going to use the sub-domain admin.website.com to allow content editors access to the Umbraco backend.
We need to create a rule that matches on the backend and restricts access unless the sub-domain segment contains 'admin'. We can do this based on the rule above. In the conditions element, the HTTP_HOST condition needs to be updated to allow www and admin:
If you have your subdomain set up and its public-facing, with this rule in place when you try and view your Umbraco backend with the subdomain it should load 💥
If this doesn't work and you encounter a 500 or 404, you will need to do some troubleshooting. Do not carry on until this step works. Some common reasons why it might not work include:
The subdomain isn't public-facing properly
The subdomain needs more time to propagate
The binding in IIS has a typo
You have some other URL Redirect that is triggering first that caused the rule to fail
Disabling Access To The Backend From The Main Domain
The next step is to create another rule that disables all access to the backend via your main domain. Doing this will mean the backend can only be accessed via your sub-domain. In your web.config section, add this rule after the admin rule:
This rule matches on the Url segment /umbraco/ and will be triggered against your primary website domain. The primary website domain needs to be defined within the HTTP_HOST condition. When implementing this, you will need to change www.website.com to your primary domain.
After implementing this rule, all access to your Umbraco backend will be blocked via the primary domain. Two things to note when implementing this restriction is that your backend preview will use the sub-domain. When building your site, you need to make sure the preview works as expected with the sub-domain. Also, if you create any custom APIs, or custom Umbraco dashboards, you will need to test the routing still works after adding the rules 🤔
Restricting access to the Umbraco backend is a good security move and is an essential step within a load-balanced environment. As you now know how to do this, you should lock all the things down 🔒. Happy Coding 🤘
