
In this article, you will learn how to build a primary navigation menu within Umbraco V8. The problem with building a menu is that they all differ. Navigation can be simple or complex. The complexity of the menu will influence the navigation pattern you adopt when building it within the CMS. In this tutorial, I will outline two approaches. Between these two approaches, you should be able to build any menu that gets thrown your way. The focus of this tutorial is on content modelling and instructing the code to render the menu. This is not a guide on CSS so take note!
This article will start off by outlining a more traditional architecture. This approach is the most frequently adopted pattern that a lot of Umbraco developers tend to pick. After I show you how to build a menu using the traditional architecture, we will conclude with a pattern that I personally prefer. One that will give you greater flexibility and power. The trade-off.... twenty minutes of extra coding! Let us start then with the simple menu.
Simple Menu
Within a simple menu pattern, the items rendered in the menu are pulled from the top-level pages under the homepage. Assuming the content-tree looked like this:
- Homepage
- Page 1
- Page 2
- Page 3
Following a simple menu design, the children of the homepage will be displayed, e.g. 'Page 1', 'Page 2', and 'Page 3' within the menu. On most sites, you will not want to render all items in the menu. This means you will need a global property that is available on all document-types. This flag can then be used by content editors to decide which menu items should be shown/hidden from the primary menu.
The best approach to add this property within the CMS is to use a base document-type that all your other document-types inherit from. You are free to name this property whatever you want, however, Umbraco has an existing naming convention that I recommend you adopt. If you use this naming convention then you will get free access to an extension method that you can use to filter menu items, saving you some time and energy. The alias name of this property should be called umbracoNaviHide. The extension method that you will get access to is called IsVisible().and is available from the Umbraco.Web namespace:
To create a menu you would then simply iterate through all returned results using a for foreach loop, like this:
This simple menu pattern is used by a lot of people, however, I am not a big fan of inheritance. Going back to our Gang Of Four, Design Patterns book. We should try to find solutions that use composition over inheritance. Having a less coupled and greater cohesive solution will increase the chances that you will not need to do lots of boring and crappy maintenance work later on! This is one reason why I prefer to use an alternative approach. The approach I favour involves creating a separate area within the content tree to define menus. Using containers, we can build a more decoupled architecture with greater flexibility to build more powerful menus. Let us see this menu in action!
Advanced Menu
In this pattern, you will not be creating a menu based on the content-tree structure. Instead, we will be creating a separate area within the content tree for content editors to create menus. This area will be decoupled from the page hierarchy. This approach will provide a lot of flexibility. In this pattern the website hierarchy looks like this:
- Homepage
- Page 1
- Page 2
- Menu
- Header Menu
- Menu Item 1
- Menu Item 2
The standard way to apply this pattern is to create the following document-types:
Menu- This document-type will be used as a container where any menu required on the website will be located. This will allow you to define multiple menus. Asides from the primary navigation in the header, it is common to have a menu in the footer as well. When creating this document type, remember to enable theallow under root nodeoption!
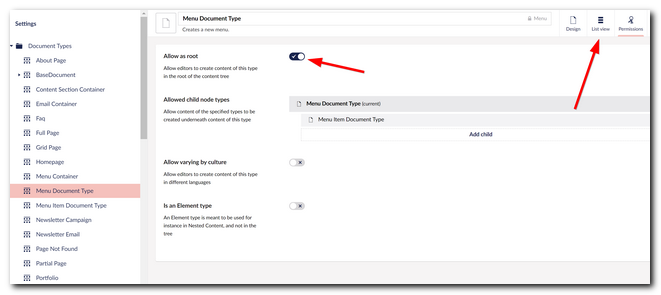
MenuContainer- A container for an individual menu.MenuContainerwill be created as a child ofMenu.MenuItem- This document type will be used to render an item within a menu.MenuItemwill be created as a child ofMenuContainer.MenuItemonly really needs to properties:
If you want to build a mega-nav you may want to build a fourth document-type called SubMenuItem. SubMenuItem will be created as a child of MenuItem. SubMenuItem should be set to allow MenuItem to be created as children as well. This architecture will allow you to build the sub-menus that appear in most mega-navs.
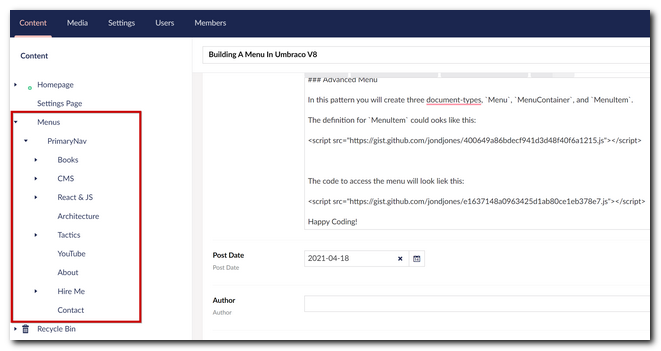
With all the document types created inside of the CMS, you can now build a menu with menu items within the CMS. See the screenshot below of how I created the menu on my website within the backend:
With these elements defined, we now need to write the code to query the CMS to get the data from it. The code to do this is shown below:
With the code to get the menu data out of the CMS nailed, the final thing to do is render the end HTML. The HTML that you will write will obviously vary based upon the design of your website. Rendering the menu is simply a case of iterating through the menu items and rendering out the HTML. I will not cover this again as this was covered in the simple menu section above.
As mentioned, I tend to favour the menu container pattern regardless of how complex the main menu needs to be. It is impossible to predict how a business and its website will change over time. The menu container pattern not only provides an unlimited number of menus to be built. This pattern also provides the ability to mix things up easily and it has always steered me well.
A working example of this menu can be seen in my sample site, which you can access here. Happy Coding 🤘
