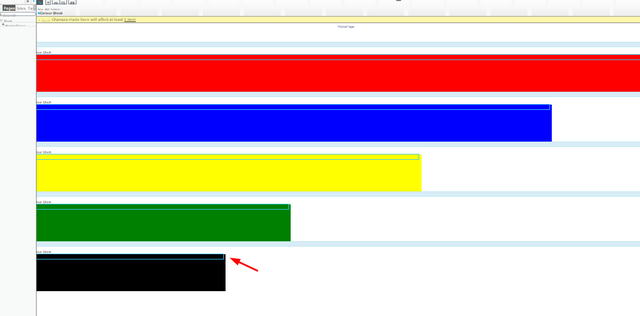
In this tutorial, you will learn how to improve the preview within an Episerver powered website. Specifically, you will learn how to improve the block preview, by displaying all the different block variation views, as seen below:
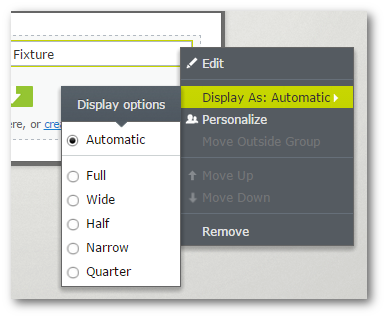
Setting up your preview to work like this can really help the content editor understand how the block could look in the frontend. This tutorial, assumes you have some display options set-up. If you are reading this and have no idea what an Episerver display option is, I suggest reading this and this first.
To make this tutorial as easy to follow, in this example the aim is to create a block and a preview that will render like this:
The first thing you need to create is a preview controller. This is the controller that will get called when the editor makes a preview request for that block in the editor.
There's quite a lot of code here :
GetSupportedPreviewAreas: In the constructor, we inject all the available display options. In this method, we iterate through each one of the display options and create a preview area for it.
CreatePreviewArea: In here we build up a list that is of type
PreviewArea. ThePreviewArealist will eventually be passed on down to the view. This list needs to contain all the information required to render each block variation in the preview.
The Preview View Model: Following good MVC practices, we should pass any data from the preview controller into the view via a view model:
In the view model, I pass a reference to the StartPage as well as the list of available PreviewArea items
The Preview View: Finally, you will need some HTML in order to render the block preview:
Notice how the code references TemplateHint. TemplateHint is the little tooltip hint that gets rendered within the Episerver editor. We will change how the default behaviour by setting the template hint that will be used when the view is being resolved!
TemplateHint: In order to make the CMS bend to your will, you can override the default TemplateHints. You can do this by creating a view and naming it after the view you want to override:
This last step is definitely optional. You do not need to change the default TemplateHint, however, I think it makes the little editor experience a lot nicer.
You now have a way to render every display option in the preview. All the above codes can be downloaded from a fully working website from my GitHub here. Happy Coding 🤘
