In this tutorial, you will learn how to cache pages powered by Episerver CMS using the output cache. You will learn all the configurations required to enable the output cache and the code required to tell IIS what pages to the cache and what pages to ignore. Getting performance optimisation correct can be a dark arts task. Instead of wasting hours of your life banging your head against a wall wondering why your cache is not working, if you need to turbo-charge your websites page performance, read on 🔥🔥🔥
How Output Caching Works Within Episerver CMS
An Episerver CMS powered website is built on top of the ASP.NET framework. Out-of-the-box, ASP.NET framework ships with something called the output cache to help developers improve page performance. Output caching is the .NET way of caching pages. Within Episerver it is also possible to cache blocks. This means that when you start thinking about what you want to add to your cache you have two strategies. You can cache on the page controller level and cache a full page. You can also cache on the block controller level and only cache certain components on your page. It is also possible to do a mix-and-match approach, so you really have a lot of power 💥
In Episerver a block doesn't necessarily need to have a controller, so some blocks can also be classed as MVC partials. Depending on if you use controllers or not with your blocks will determine how .NET will cache the component behind the scenes. I always recommend you use controllers with your blocks as it makes your code easier to read, it gives you more control of how a block is rendered and it will allow you to use view models and unit test your code. If you do not use a block controller, you can still cache blocks using the partial output cache. This cache works using MemoryCache and was introduced in .NET 4. In theory, you can change this cache provider to use Redis or a third party cache database, however, this change is out-of-scope for this blog post 😕
Configuring Output Cache Profile
Enabling and configuring the output cache is pretty simple. In the web.config you need to create a cache profile. The configuration to do this is shown below:
The enableOutputCache flag is useful to set which environments should be cached. Using this flag makes deployment and development much easier. When you enable caching... your pages cache 😕. Enabling output cache in your development environment is a bad idea. Developing a site with caching enabled is a nightmare. The cache will prevent you from seeing new code changes. Using enableOutputCache allows you to turn on and off caching between your environments. In the cache profile configuration, varyByParam is also a very useful attribute to be aware of. The varyByParam property is a semicolon-separated list of params that are used to uniquely define a cache key. In some instances, you might not want to cache a page if it is also using a visitor group. If you need to prevent a page from being cached that contains sensitive member area data, adding parameters in varyByParam will prevent it.
Output Cache Attribute
To enable output caching on a page or block, you need to apply the [ContentOutputCache] attribute to its controller, or, the actions within its controller. This is done like this:
Enable Browser Caching
The output cache will cache pages in memory on the server. To further improve performance, you should enable browser level caching. Browser level caching, will prevent site visitors from making more requests to your server than needed. To enable browser-level caching, you need to configure your request pipeline to add certain response headers to the request. These headers will tell the site visitors browser to cache the page. If you don't do this, you will see a no-cache value set in your pages response header. To enable browser caching is pretty simple. At some point on a page load, you need to add the following code:
On most of my projects, I normally implement this code in a base controller. Using a base controller and making sure all your page controllers inherit from it, means that it is very simple to apply this change globally on your site. Assuming you have added this code to your site, the next time you compile and run your website and load it in a browser, the page should cache. To prove this, look in the pages response header:
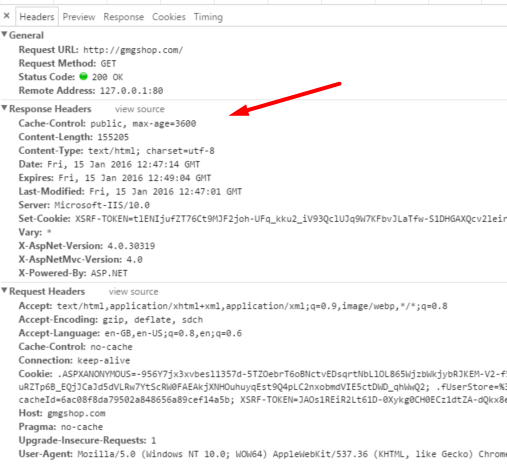
As shown the Cache-control attribute is now set. This means that your page will be browser-cached 😊. If you look in the Request header section value, you may see the no-cache attribute set. You do not need to worry about this, this is fine and dandy. This is part of the process of your browser talking to the server, not the server talking back to the browser telling it to cache the page moving forward. This does not mean that your page is not cached server-side.
Caching can be a complex beast, however, getting the basics up and running is fairly trivial. All you need to do is create a cache profile in your web.config and then apply the output cache attribute on the page or block controller that you want to cache. After that you're golden. It is also good to enable browser caching by updating the response values appropriately. Happy Coding 🤘
