Having a performant website will be one of the most important factors in making a site successful. One technique that you can employ to speed your page load times is a technique called cache-busting. Being able to add really long cache invalidation times to the assets on your website will reduce the number of requests being made to your server. Getting the balance of what to cache and how long you can cache everything is tricky. If you cache assets for too long and the asset is updated, you have an issue. Clients will be requesting old JavaScript files, CSS files and potentially images, this may make your site work in unexpected ways! On the other hand, if you have really low cache times, your pages might not load very quickly. If you want to learn a good technique to help overcome this dilema, read on.
Why Use Cache Busting?
To get good performance on your website, you will need to enable caching on all your Episerver pages and assets, e.g. CSS files, JS files, images. To get the best performance you want to add a long expiry timeout on your items. Images and assets, unlike content, once uploaded into the CMS will probably never be updated again. Having short cache times of these assets makes little sense in terms of performance. We want to cache these assets for as long as possible, ideally forever if they will never change. The downside of long cache times are updates.
When an Episerver asset is requested by a site visitor's browser (not Non-Episerver static files) that has a cache expiration header set, the asset will be returned to the visitor's browser and the browser will cache it. When a browser has cached an asset with a cache time set, whenever that user looks at that page the browser will use that cached asset. The browser will use that cached asset until:
- The expiration period is reached
- The user clears their browser cache
If you have a client who wants to run a sales campaign, say a Black Friday sale, and they want all their users to see all the updated sale images at the same time, you have an issue. If the user uses your site a lot, the current products images might be cached in their browser already. You won't be able to invalidate user browser cache, so their page will only display the old non-black Friday images. As the browser stores a cached copy of your static assets, it won't look on your server again until the cache period has been met. This is where cache-busting comes into play...
What Is Cache Busting?
Cache busting is a strategy, whereby you add a unique identifier onto the URL of your asset. When using Episerver it is a good idea to set this identifier as a hash based on the assets published date. Adding this unique identifier, allows you to get around the issue of people having assets cached locally. When an asset changes, the URL of all your assets that implement the cache-cust will also update. The HTML with the new URLs are sent to the client. These new URLs will not be cached so the browser requests them from the server. For example, say you have this URL with a cache time of 1000 years:
www.website.com/logo.jpg
When this asset gets browser cached, the local browser cache would never call the server again to load the image until the year 3000. With cache-busting enabled, the cache time could still be 1000 years, however, it now has that hash:
www.website.com/logo.jpg?12-06-2020
The image is updated in Episerver. This generated generates a new hash:
www.website.com/logo.jpg?13-06-2020
The next time the page HTML is requested from the client, the browser will see these new URLs and request them. In the client browser cache, two copies of your asset now exist. Both with 1000 year cache times. The client will see the version reference in the HTML. If you have a one hour cache times on your HTML pages, you now have a way to use long cache periods with an ability to ensure the client sees the latest version. Magic ✨✨✨
How To Add Cache Busting On Your Website
Luckily, adding cache-busting into an Episerver website is easy. Someone else has done all the hard work for you! If you head on over to, https://github.com/bjuris/EPiServer.CdnSupport you can download the project. Unfortunately, I don't think it has been created as a Nuget package, so you'll have to manually add the code to the project. Next, you need to add some appsetting in your web.config. Add these two settings Episerver:CdnExpirationTime and episerver:CdnExternalMediaUrl. Episerver:CdnExternalMediaUrl can be left empty if you just want it to run on the current domain.
When you run your website, you should now see a unique identifier added to any rendered out Episerver asset URL on your site, like so:
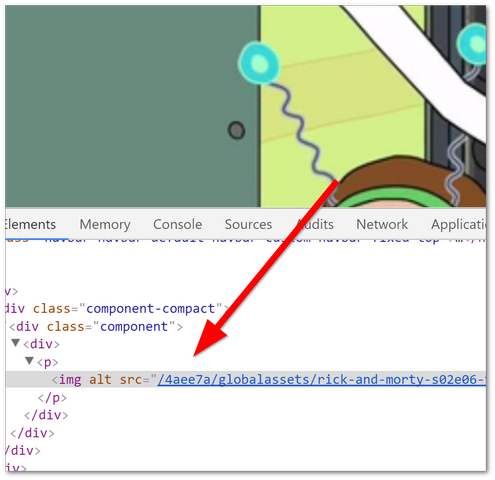
The plug-in uses the assets published date as the hash. As you can see above, that hash is appended to my image URL. With the plugin installed, you can set your static files cache times to infinity if you really want to. If a content editor ever updates the asset within Episerver, a new hash will be generated, the link in the page HTML will be updated. When the page cache time is breached, the user will now see the updated asset, simple! Happy Coding 🤘
