In this tutorial, you will learn a little about Umbraco properties, specifically about some properties that will give more power to content editors in order to create powerful dynamic pages. This is the fourth article in my series 'Creating Your First Umbraco Page' series, see the links at the bottom to find the related posts. So far we've split a very boring HTML page into a master layout, header component, footer component and a homepage template. The content being rendered on those pages are all hardcoded and content editors can't update any of the text. In today's guide, we're going to change that 💥💥💥 In this tutorial, we will create a new document type that inherits from a master document type. What is a master document type?
Every document type on your website will have common properties, for example, all pages will have a page title. Each document type will also have unique properties, for example, the homepage document type might need a property to render some welcome text. In order to design the Umbraco backend optimally, you may want to create a master document type that all other document types inherit from. In this document type, you can add all the common properties you want every other page to inherit. This approach means that you can share common properties between document types without a lot of effort. Winner 🏆🏆🏆 To learn more about master document-types read this. From this point forward I will assume you have created one. The first step in making our pages dynamic is to add some dynamic properties onto this master document type:

To get started, open up the master document type:

When the document-type editor loads for the master document type, you should be presented with a page similar to the above. From this screen, you can add properties to the document type. To make a good CMS experience for content editors, you can group related properties into tabs. On my Umbraco projects, I tend to only use these tabs:
Metadata: A tab to store all the page meta-data properties, e.g. page title, meta keyword etc...
Settings: A tab for page, related settings, these types of settings could include things like 'include in breadcrumb', 'exclude from search results', 'do not index', or 'exclude from sitemap'
Main A tab to add the specific document-type properties
Even though Umbraco comes with some default properties, you can create as many custom tabs as you want. The names that you call your tabs is completely up to you, however, one common mistake I see on a lot of projects is that developers don't spend that much time thinking about good backend naming conventions. My advice is to be consistent with the tab names. Use names that make sense to the content editors who will be using the site, rather than maybe the developer who writes it. If you are stuck figuring out good names, ask the people who will be using the system. If you take this path, do not be surprised if the names the content editors decide to use are different to the names that you would have picked. You won't be the person updating content every day, do what works for them!

A good place to add the page title property would be in a tab called metadata, as this is the area on the page the title property will be rendered. In the metadata tab, you should see a giant 'Add Properties' button as seen above:
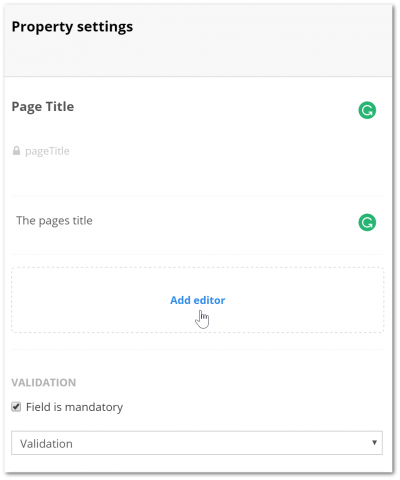
To create the property in the metadata area, click Add Properties. This will launch the 'Property Settings' screen. Add an appropriate title and description. Since every page needs this title property, tick the Field is mandatory checkbox.

Lastly, we need to define the property type. The data type will define the type of data the content editor can add to the property. This is done by clicking the 'Add editor' link. Clicking on this will load the dialogue above. For a page title, we only need a string to represent the page name, so the string property is most appropriate. If you really wanted, you could also use the rich-text property, however, this makes less sense. For reference, you can even create and define your own property types, but, that's definitely something for a later date 🧞♂️.

After defining the page property, click the Save button, located on the bottom left-hand side of the CMS. Now the property is defined on the document type, the next step is to render it within a template. To do this, open up the master template:
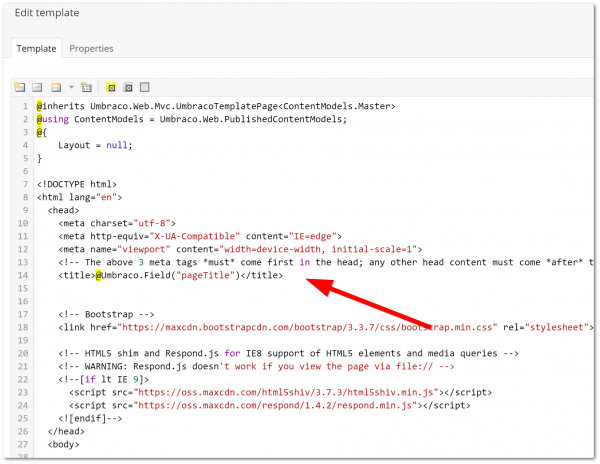
In my example, I replace the hardcoded text within a reference to the document-type property. Obviously, the field name I used needs to exactly match the property name created early, otherwise nothing will display. After saving the template with your latest changes, it's time to go and test it 🧪::::::::::::::::
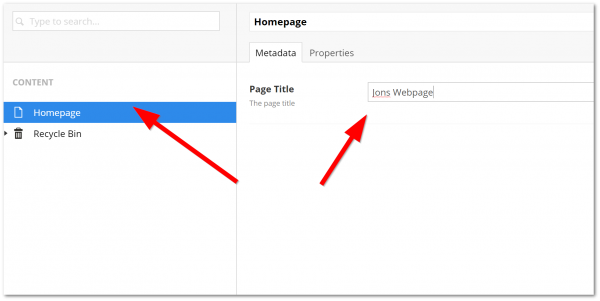
In the Umbraco backend, open the content section. In the content tree, open the 'homepage'. If your site does not contain any pages yet, create one. When editing/creating a page you should now see a tab called 'metadata' with a property called 'page title'. Add some text into the property, mines called 'Jons website', original I know 🤪. Next, save and publish your change.
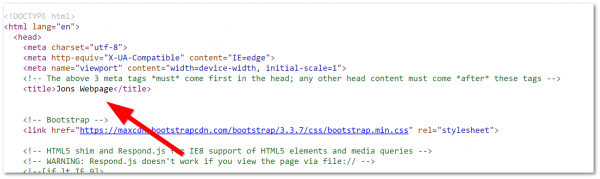
When we browse the website and do a view source, we should see the page title being dynamically populated! Following on from this process you can now add properties to your master document-type, or page document-types. In the next lesson, I'll focus on creating a dynamic menu. Happy Coding 🤘
