
In this tutorial, you will learn how to model content within Optimizely CMS v12. In this guide, I will walk you through a complete end-to-end process of creating a page within the CMS. I will take a free HTML template and show you how you can convert it into Optimizely pages and blocks. If you want to know, how to model the content, build the menu, understand the differences between framework and .NET Core, how to deal with global settings and finally build a master layout then this is the guide for you 🔥🔥🔥
The one caveat with this guide is the detail. It would be impossible to take a deep dive into all the topics I just mentioned within a single blog post. This is why I have written this guide as a high-level overview of all the different parts required to build a page. Hopefully, by seeing a high-level overview, it will give you a good roadmap that will allow you to build your first Optimizely website 💥
HTML Template
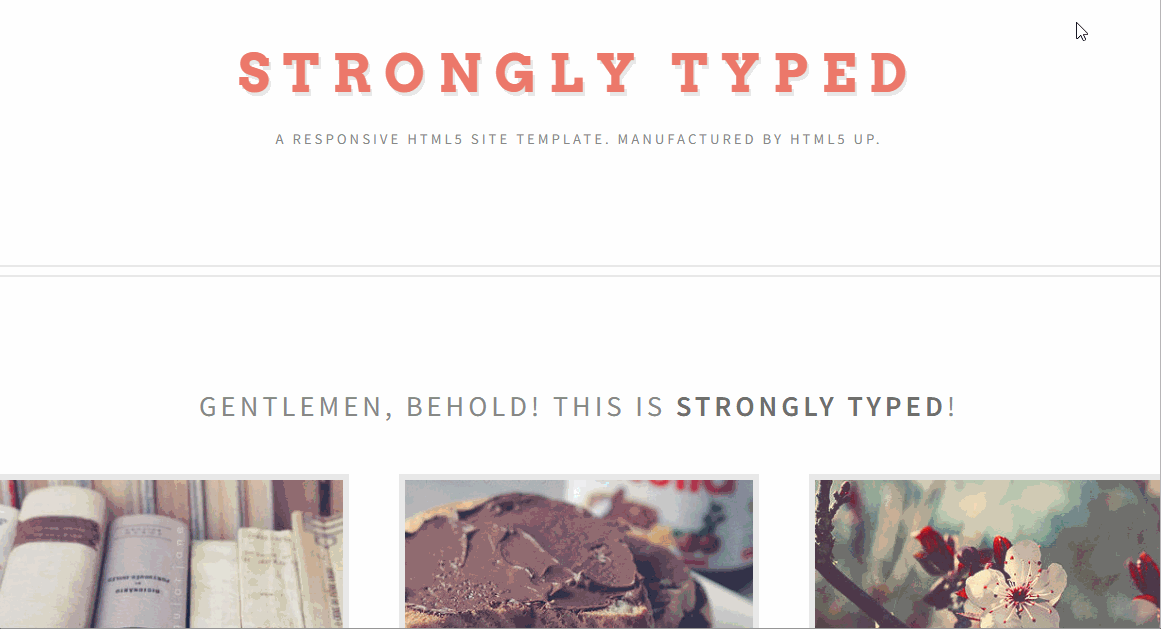
In order to model content within Optimizely, we will need a starting point. In this guide, I will use a free template that I downloaded from HTML 5 Up. Specifically, I will use the Strongly Typedtemplate.
After downloading the theme add all its assets within the wwwroot folder.
Page Types
Optimizely uses a code-first approach to content modelling within the CMS. To create pages templates and components within the CMS, you start by creating a class within your codebase. Pages are built from page type definitions and components are built from block type definitions. On every project, you will need to create a homepage page type. The code to model a homepage is seen below:
With this code added into your codebase, after you build and launch the CMS, on start-up Optimizely uses reflection to read in the meta-data you add within these classes and then adds the data within the database. When building a page-type you need to add this meta-data:
ContentType - This attribute will define the basic page meta-data. You need to fill in the template name, a GUID (GUID is handy to enable page importing/exporting), description and the name of the tab it will appear under in the new page screen
AvailableContentTypes - Define what other pages can be created underneath it
ImageUrl - Associates a thumbnail screenshot that will be displayed within the page creation screen
Adding properties to the page template is achieved by adding properties to the class. Like the page-level modelling, you will also need to add an attribute onto the property, the Display attribute.
You need to also add the virtual modifier to the property definition, otherwise, Optimizely will not auto-populate the CMS data correctly. Properties can be built from lots of types including string, XHtmlString, ContentArea, and int.
Controller and View
Rendering a page is done using MVC. You need to create a controller for the page and associate it with the page type. In Optimizely you create a controller the same way you would in .NET Core. The big difference is that you need to inherit from PageController instead:
Next, you need to associate a view with the controller. In this example, you would create a new cshtml view in this location:
Views ➡ Homepage ➡ Index.cshtml
When passing data into a view, you should use a view model. There are a few view model patterns that you can use. I use a slightly different technique to most, however, the approach I am about to share has given me far fewer headaches over the years. I pass two objects into my view. One is the page or block type definition. The second is a POCO that contains any extra data required within the view. In MVC we can only pass one model down from a controller to a view. This is why I use a pattern I made up called the ComposedViewModel. The code to allow for two models to be used is shown below:
NOTE: You may also need to create a version that restricts by the BlockData type as well!
Master Layout
Every page will need to implement from a master layout to avoid duplication. A web page is made up of four main parts:
- Head (Metadata)
- Header & Menu
- Content
- Footer
The HTML to render the content part of the page will be done in the corresponding page view. The head, header and footer should be added within a global layout rather than a page view. Creating a layout in CMS 12 is exactly the same as CMS 11. Layouts are just a view with a '.cshtml' extension that are referenced from the page view:
In a layout, you will add the page head, the header and the footer. The main challenge when building a master layout is getting access to the current page's data so you can create the head section. To get around this issue, I structure my master layout files like this:
When creating a website, a lot of developers (including the Episerver foundation site) use a model within the layout file, e.g. they use the @model modifier at the start of the file.
This approach is used to access the current page object to render the head section. Things like the page title and the page description. I hate this pattern as it leads to code in the master layout which is untestable. It can also cause maintenance issues if you work with different types of content.
I like to put the header, footer and meta section in partial views as it leads to a nicer architecture. In ASP.NET Framework, we had 'Partial' views. In .NET CORE/MVC 5 we have ViewComponents. The code to call a view component is different to the code to call a partial view, gone is the HTML.Partial() call. Instead, you will by using @await Component.InvokeAsync(""):
You can still access the current page object within the ViewComponent controller using this code:
If you agree with the Gang Of Four mantra of composition over inheritance, you will see the benefit of this approach 😊
Header and Footer
To create the header and footer you will need to think about two things:
Menus: In the header, you will likely need to include the site primary menu. How do you best model a menu in Optimizely? To render a menu, a lot of developers use the Display in Navigation property found on the PageData object and simply do a GetChildren() API call on the homepage to build the menu.
I avoid using this pattern as I do not think it gives a good content editing experience. Instead, I create three menu related page types, Menu container, Menu and MenuItem. I use these pages to create a separate area in the content tree (under the root node) to store all menu data. I like this pattern as it allows for multiple menus to be created. It also allows for more complex mega-menus to be created. Having one central location within the CMS for editors to build menus creates an easier to use system. I will cover menu patterns in a later video 😊
Global Settings: Optimizely has no out-of-the-box way to manage global settings. Any data that you need to model on the header or footer will need to live somewhere in the CMS. As this type of data does not live on a single page, you need to pick somewhere in the CMS to store them. I recommend modelling settings within a settings page. The parent of the settings page in the CMS content tree should be the root node. The code to create this settings page is the same as any other page and looks like this:
One thing worth noting is the use of the Access attribute. Applying this attribute here will prevent anyone who is not an admin from creating a settings page within the CMS and potentially screwing the system up!
Blocks
In order to add components onto a page you need to create blocks. The process to create a block is exactly the same as creating a page. The only difference is you inherit from BlockData instead of PageData:
ContentArea: To allow content editors to add blocks onto a page you use the ContentArea property. The code to add a ContentArea to the homepage is shown below:
You can limit what blocks can be added into a content area, using the AllowedTypes attribute.
Content Modelling
It is time to build the components within the Strongly typed template. The template contains four components that can be turned into blocks. Below gives a breakdown of how I built these:
Card Container Block This block looks like this:
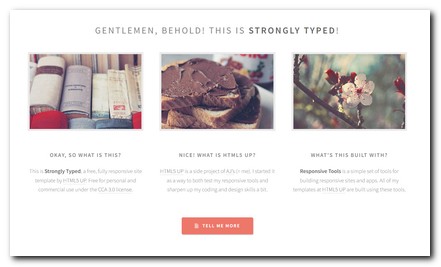
I modelled this block using these properties:
Titleas typeXhtmlStringCardAreaas typeContentArea. I then created a card item block to populate the itemsCtaTitleas typestringUrlas typeUrl. You need to use theEpsierverone other the CMS will complain
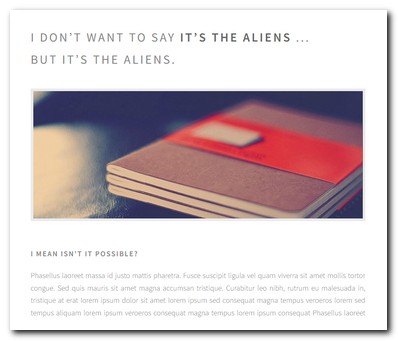
Banner Block This block looks like this:

I modelled this block using these properties:
Titleas typestring
Blog Area Block This block looks like this:
This block pulls in content from other areas within the CMS and has no properties. This code uses a custom service I created to get the content. If you want to use dependency injection with any custom services that you build, you will need to register the service with the DI container. You can do this within an initialisation module. You can then access other content within the CMS using the IContentRepository.
Contact Us Block This block looks like this:
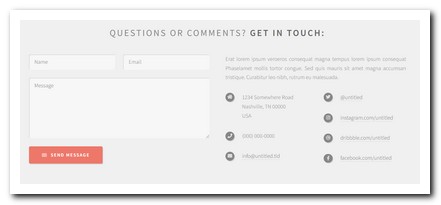
I have skipped modelling this block. You could use Episerver Forms in this instance.
You now know how to model content and build a website using Optimizely CMS 12 and .NET Core. You are an Optimizely CMS Jedi master, congratulations 👏👏👏. You can access my starter kit here. Happy Coding 🤘
