
In this tutorial, you will learn how to install Umbraco V9 (.Net 5) using Visual Studio. As of V9 Umbraco is now fully .NET 5/.NET core compatible 🔥🔥🔥. The selling points for using Umbraco to power your website is that it is free, it's open-source, it comes with member management and it is not a Saas CMS. Not being SaaS is beneficial for projects with complex needs. Umbraco provides many ways in which you can customise the CMS. Being able to add custom screens and being able to define what happens when the CMS boots up is often not possible when working with some of the new SaaS CMS systems. This ability to host your site, however, best meets your needs, combined with the ability to customise it without restrictions is a great selling point you should keep in mind, so what have you got to lose 🤷
There are two ways of installing Umbraco V9, via the CLI or via Visual Studio. In this guide, we will focus on the Visual Studio route. The good news is that the installation process within Visual Studio should take you about 10-15 minutes and it is pretty easy. If the thought of a CLI approach resonates with you more, I have recorded a video with a complete walkthrough that you can access here. One area that I cover that guide that I will skip in this one, is setting up the prerequisites. For this guide I will assume you have:
- IIS installed
- SQL Server set-up and configured with SQL authentication
- A SQL account with login and remote access permissions
- A hostname set-up in your host file
- Visual Studio installed and patched to be over version 16.8
- .NET 5 installed
- The .NET 5 IIS hosting bundle module installed
If you are unsure about how to do any of these things, check out the start in the other guide before starting this one. Assuming you have your PC configured, let us install Umbraco 💥
Installing Umbraco V9
To install Umbraco 9 in Visual Studio, you will need a special Umbraco specific Dotnet project template installed locally. The only way to install this template is by running a command in the terminal. This will be the only command in this guide.. promise ✌. Open a terminal using admin privileges and type this command:
After running this command, you could be able to type this command and then see an item called umbraco in the list:
With the template installed, fire up Visual Studio. Create a new project, in the All Languages dropdown select C# and within the All Project Types dropdown select Umbraco:
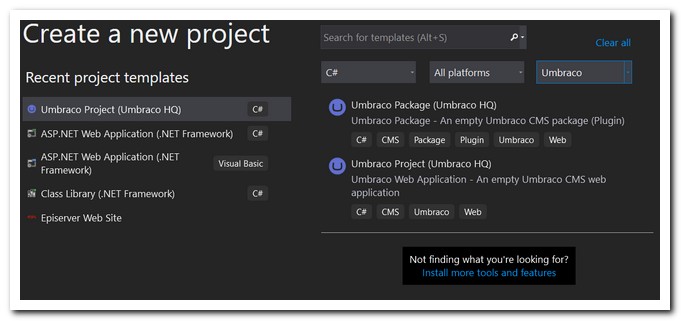
Select the Umbraco Project template and IGNORE the Umbraco Package template. Click Next, and enter in a project name and location. I recommend avoiding using the word Umbraco in combination with the . character in your solution name. Having a name like umbraco.mywebsite can cause namespace clashes in your code when you try to call Umbraco APIs. Avoid making extra headaches for yourself by following a simple naming convention! When finished click Next to get to the final screen, Additional Information:
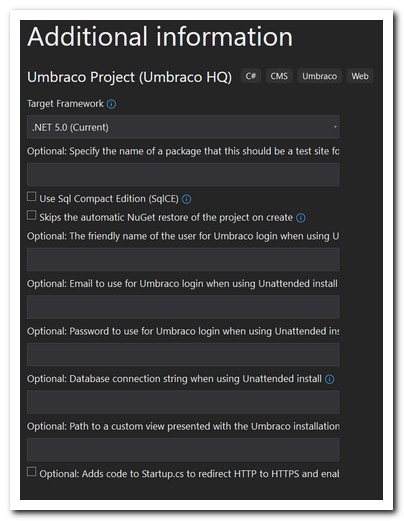
It is possible to add all of your Umbraco project details to this screen, however, I recommend leaving all this stuff blank. You can fill in all of these settings very shortly within the normal Umbraco installation wizard!
Run the Umbraco Wizard
Clicking on Create will fire up the Umbraco installation wizard. This wizard will look very familiar to anyone who used V7 or V8. The first step is to create a CMS account. Jot these details down as without them you will not be able to log into the CMS! Next, you need to define where the wizard should install the CMS database. I recommend that you avoid using the SQL Compact option which is selected by default. Instead, I recommend you install the database within a SQL server instance. If you go this route, make sure an empty database exists within the SQL server first. I tend to use the sa account when I set these things up locally. If you do the same, make sure SQL authentication is allowed and the sa account is enabled with remote access privileges.
When the installer finishes, Umbraco will now load. You can access the CMS by adding /umbraco to the end of your hostname 🔥🔥🔥
Installing A Starter Kit
After Umbraco finishes installing, you will have a blank slate to build a website. If you try to view the homepage you will see nothing. A blank slate can be daunting for people new to Umbraco. For Umbraco newbies, I recommend installing a starter kit as your first task. Umbraco's most popular starter kit is called The Starter Kit. If you want to install the StarterKit, I recommend that you install it using NuGet. You can install the official Starter Kit for Umbraco here. Run this command in your Visual Studio package manager console to install it:
After running the command, rebuild the site. Test it installed correctly, by doing an F5. If things have gone OK you should see a working homepage!
Troublshooting
As can be seen in the video above, I had issues getting the starter kit to work when I tried to install it with the CLI. If you hit an error, check the logs to see what's gone wrong. The logs can be accessed from within the backend here:
Settings ➡ Log Viewer
You can also get access to the actual log files from within the webroot, here:
umbraco ➡ logs
Publish Profile
In order to make your site viewable within IIS, you can not simply create a website and then point the physical path property to your code files (like you could in the ASP.NET framework site). Instead, you will need to point IIS to a folder that contains your website published files. In order to generate those files, you need to create a publish profile in Visual Studio. First, I do not recommend putting the published files within your webroot. Doing this can cause weird Visual Studio compiler errors and it can make your source control bulkier than it needs to be. I typically put mine in a website on my C drive called Websites. Remember, you need to give this folder read/write folder permission access so Visual Studio and IIS can write to it. I tend to add the everyone account to this folder and give it full control for simplicity. Not ideal security-wise, but it works.
Setting up a publish profile is done within Visual Studio, by clicking on Build ➡ Publish. The default publish profile settings that I use look like this:
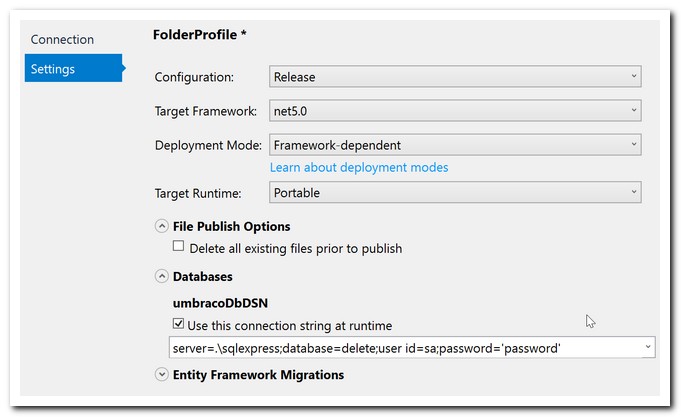
I do not recommend enabling the 'delete all files' option. If you do this locally, you will encounter locking issues. One tip for any locking issues, you can use Lock Hunter to free the file up. If you follow all of these steps, you should now have a working Umbraco V9 site up and running. Happy Coding 🤘
