
In this tutorial, you will learn how an Umbraco v9 project is structured. Umbraco V9 is now fully compatable with .NET 5/.NET Core. The Umbraco project structure has changed quite a lot from v8 and to v9, things are now very different😲. Within this guide, we will look at those changes, specifically, you will learn:
- How Umbraco bootstraps
- Where key config files now live
- Tips on how to structure your project.
- How to make class libraries work
- How to configure Model builder
- How to do route hijacking and create a controller.
We kick things off by talking about the new project structure and what all the different files do 🔥🔥🔥
Program.cs: In Umbraco 9, Program.cs is now the entry point for the application. Under the hood, a web project is now a console application. Like all .NET console applications, things kick-off by executing the Main() method. The code in Program.cs is simple enough:
The most important part of this class is found in Line9, where a reference to 'Startup' is called. This will launch 'startup.cs' 💥
Startup.cs: StartUp.cs can be compared to the Global.asax file in ASP.NET framework. All .NET Core applications require a StartUp.cs file. StartUp.cs has two methods ConfigureServices and Configure. ConfigureServices is the method to configure the IoC container. You can still configure the container in a Umbraco composer if you want to, however, in terms of .NET core this is the new recommended place to configure dependencies. The other method Configure is used to configure the request pipeline.
On Line29, notice the UseUmbraco call. This is the call/code that bootstraps the CMS. All the routing, back-office registrations, etc.. is triggered off from this call!
AppSettings.json: In .NET Core the web.config has also gone. Instead, you now use appSettings.json to configure your application. In .NET 5 you can also use environment variables. The precedence in settings load order is:
- Environment variables
- Configuration settings
Umbraco: You will find a lot of Umbraco related files in this folder. If you need to find a Umbraco specific file, start looking in here. Some useful folders worth noting that live within here:
Logs: In previous versions of Umbraco, the log could be found within
App_data. In Umbraco V9 and above, the log files can be found now inUmbraco/logs.Models: This folder is the default location for the classes generated by the Umbraco models builder. I recommend changing this and I will cover that shortly
wwwroot: Used to save static files like images, CSS, JavaScript. These files can directly be accessed by {root}/wwwroot or using the domain, w.g. 'http:///mywebsite/main.css.'
Now you have a good understanding of the new project structure, let us think about how to add and structure your custom code 🚀🚀🚀
Class Libraries
Where should you put your custom code? My recommendation is to avoid adding your custom code into the main website project. As a minimum, I recommend that you add all your custom code into one or more separate class libraries. In my projects, I call my main class library, 'Project.Core'.
One nuance with this approach is accessing the models generated by the Umbraco models builder. If you want to access a model generated by the model's builder within the class library, you will need to change the default behaviour. The reason for this is to avoid a cyclic reference error. If your class library references the website project to get the models and the website project needs to reference the class library to access the custom code, the compiler will get in an infinite loop. This is why you will need to create a separate 'Models' class library. Following this pattern your project structure look will look like this:
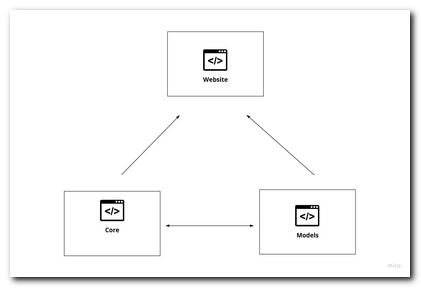
Core: Add all custom controllers, view models, etc.. here. If you want to define controllers etc.. within this library. If you want to do Umbraco specific things in this project you need the class library to reference these Nuget packages:
Models: This library is solely used to store all the models generated by the Umbraco model builder. In order for the project to compile after you generate the models, you will need to reference these Nuget packages:
Model Binding
When it comes to content modelling within the CMS, Umbraco uses a model's first approach. I will cover document types in more detail within a future post, for now, the important takeaway is that Umbraco can generate C# classes based on the document types created within the CMS. You build your document types within the CMS and then you use these models in the codebase to build your website and interact with the CMS.
This feature is free and it comes out-of-the-box with the CMS. The only caveat is that if you want to use these models in a custom class library you will need to change the default behaviour. If you want to use a class library, the config changes you need to make are within AppSettings.json:
There are three important settings here:
ModelsMode: Set this to SourceCodeManual. This mode will only generate models when someone clicks the Generate button within the CMS:
ModelsDirectory: The folder location where the models will be generated
AcceptUnsafeModelsDirectory: This is needed to allow the classes to be generated outside of the webroot. If you want to use ../ within ModelsDirectory, this needs to be set to true!
This is the way I set my project, however, their other options. You can learn about the different options here.
With the models generated it's time to wire up a page 🧠🧠🧠
Controllers
When building a Umbraco project, I recommend that you use route-hijacking. Route hijacking allows you to associate a page request with a custom controller. In Umbraco, you can create one controller per document type. As long as the controller has the same alias made as to the document-type and it inherits from RenderController the routing should magically work! The code to build a custom controller is very similar to V8. The main difference is that constructor and the ability to use IActionResult:
On Line18, we create a document-type using the models generated by the Umbraco models builder. A change in v9, is that the model takes a 'IPublishedValueFallback' as a constructor argument in addition to an IPublishedContent item.. You can get access to a populate 'IPublishedValueFallback' object via the constructor. Pass it in as a type and it will automatically be populated 💥
These are the main things you need to do to set yourself up with Umbraco v9. After doing these things, you are ready to start building a website 🔥🔥🔥. You can see an example of this project structure working in my v9 starter kit here. Happy Coding 🤘
